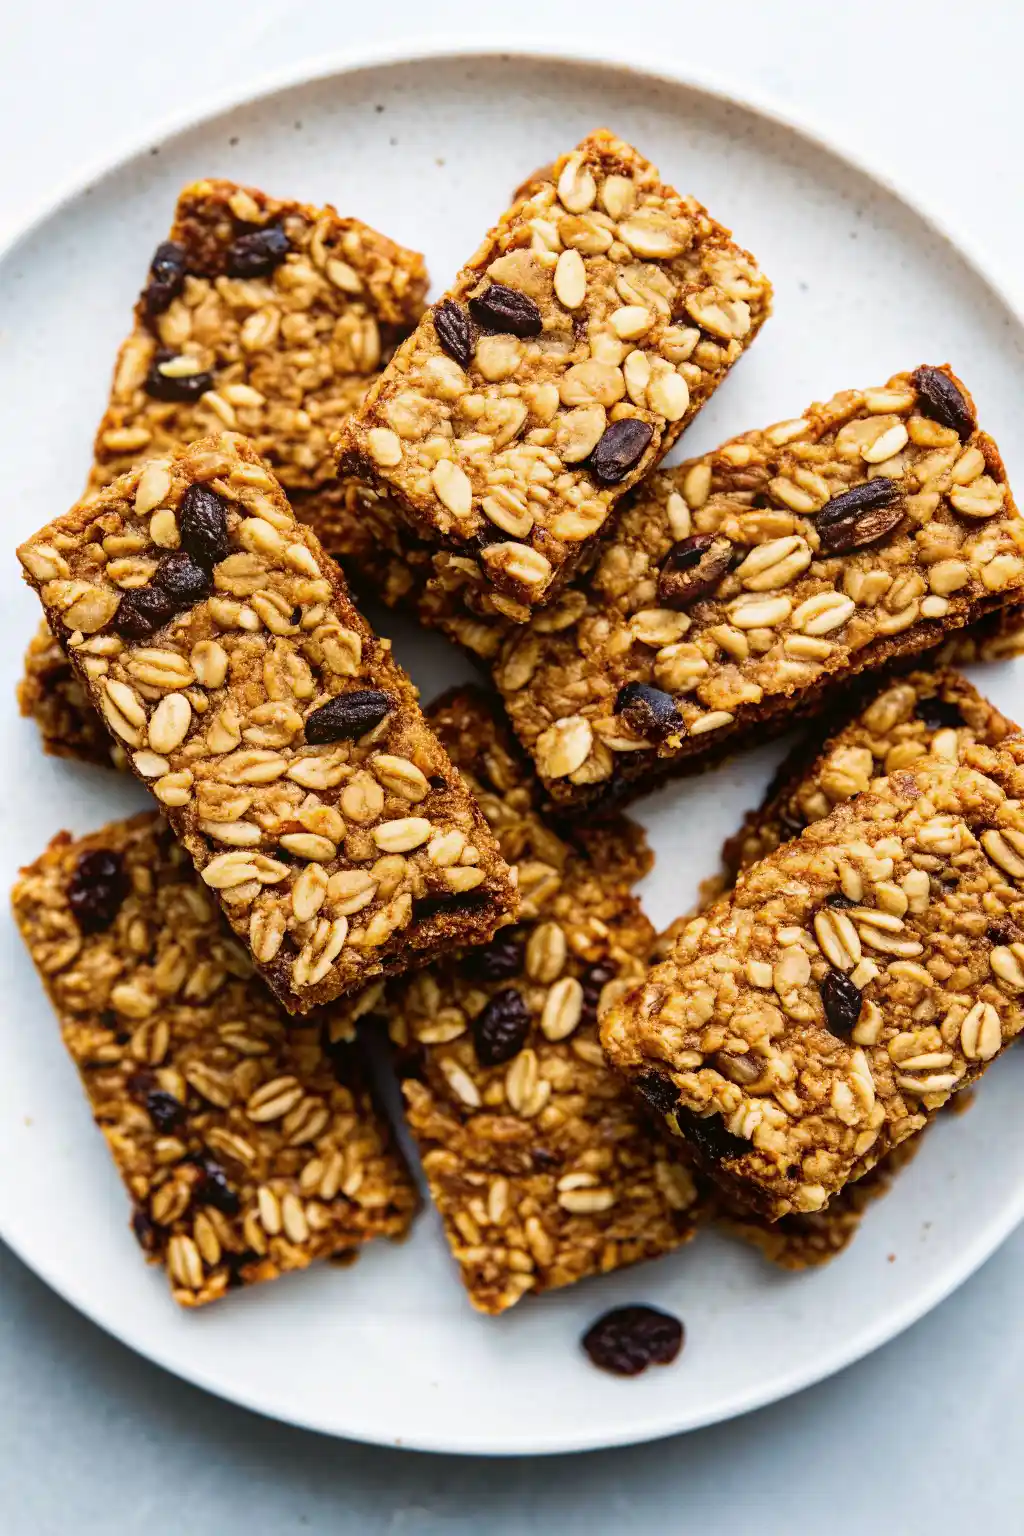
S’mores granola bars are one of those snacks that disappear faster than I can cut them. They’ve got that chewy, no-bake magic with just enough marshmallows and chocolate to make my kids, Lily and Sophie, think I’m the best mom ever. The best part? I can throw them together in minutes without turning on the oven, which means more time for eating and less time for kitchen cleanup.
Looking for more easy no bake treats Try my No Bake Blueberry Oat Bars which are just as simple and kid approved.
Table Of Contents
S’mores Granola Bars
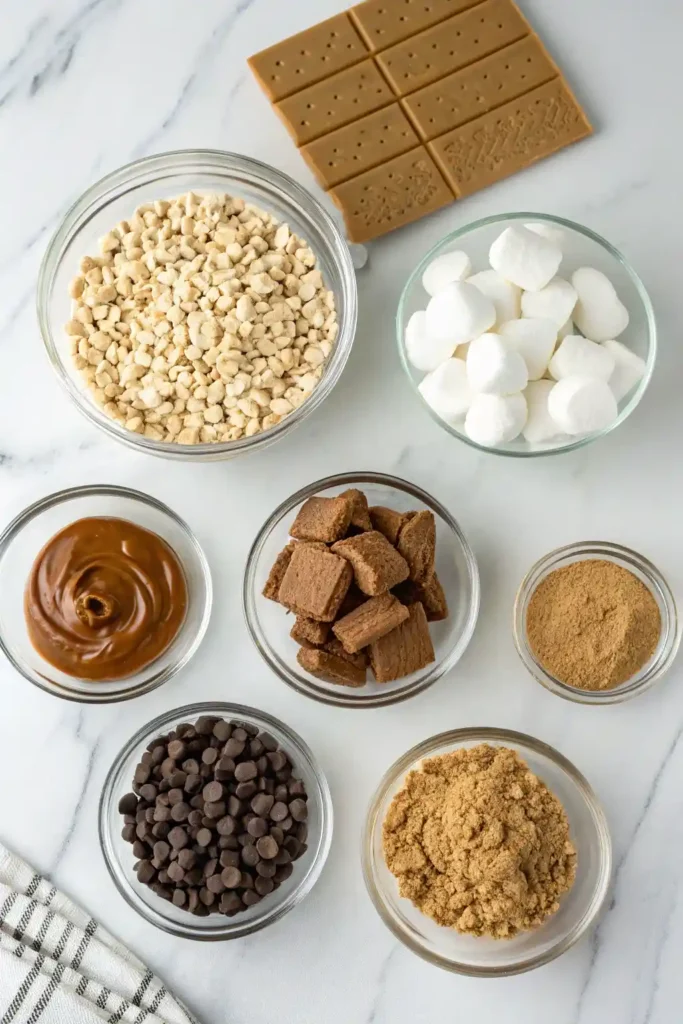
Ingredients
Equipment
Method
- Line an 8×8 inch pan with parchment paper, leaving a little overhang for easy removal.
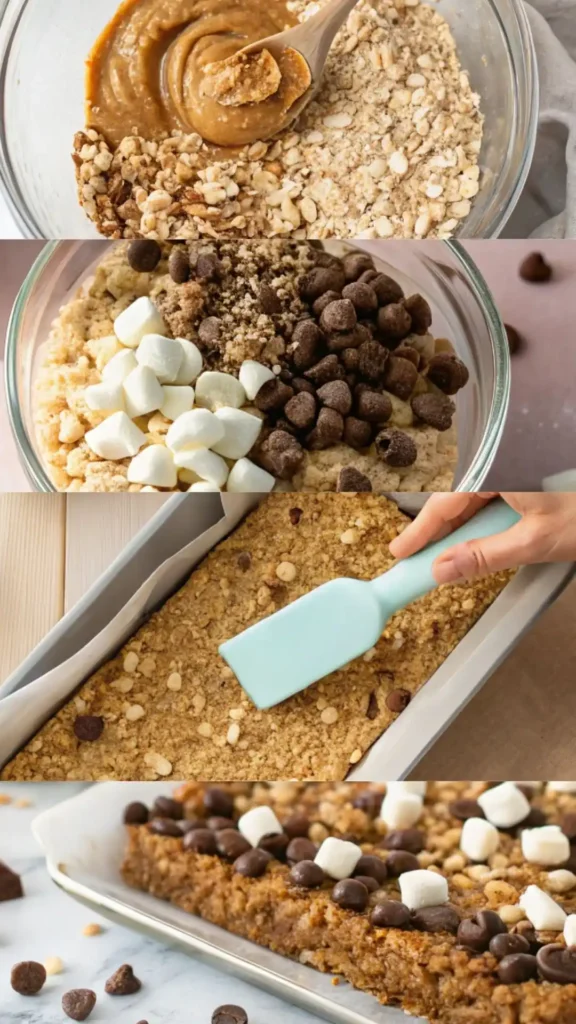
- In a medium saucepan or microwave-safe bowl, melt the honey and nut butter together until smooth. Stir well.
- In a large mixing bowl, combine the oats and crushed graham crackers.
- Pour the warm honey mixture over the oats and stir until fully coated.
- Gently fold in the mini marshmallows and chocolate chips.
- Press the mixture firmly into the prepared pan using the back of a spoon or spatula.
- Sprinkle extra marshmallows and chocolate chips on top, pressing lightly so they stick.
- Refrigerate for at least 1–2 hours until set.
- Lift out of the pan using the parchment overhang and cut into bars.
Notes
Store bars in an airtight container at room temperature for up to 5 days or refrigerate for a firmer texture.
These bars also freeze well for up to 2 months — just wrap individually before freezing.
What Makes This the Best No Bake Granola Bar Recipe
S’mores Granola Bars are one of my favorite quick snacks to make when I want something sweet without the hassle of baking. If you have tried making S’mores Granola Bars before, you probably know how tricky they can be. They can fall apart before you even get a bite or end up tasting so sugary that one bar feels like too much. This recipe solves both problems. The bars stay chewy, hold together well, and still give you the perfect mix of marshmallows and chocolate in every bite.
The beauty of S’mores Granola Bars is that they are a true no bake granola bar recipe. I can melt the ingredients, stir them together, and press them into a pan in less than fifteen minutes. That is exactly the amount of time I have before Lily and Sophie start sneaking chocolate chips from the counter. David calls these my win win snack because they work just as well for after school as they do for a late night treat.
I will always have a soft spot for classic campfire s’mores, but S’mores Granola Bars bring all that gooey chocolate marshmallow flavor into a form that is easy to pack, store, and share. You get soft pockets of marshmallow, a light oat crunch, and just enough chocolate to make every bite feel like a little moment of joy.
Ingredients You’ll Need
When I make S’mores Granola Bars, I do not go shopping first. Almost everything is already sitting in the pantry, waiting for me to turn it into something chewy and sweet. The only time I run to the store is if Lily and Sophie have already eaten half the chocolate chips.
The base is simple — rolled oats, a drizzle of honey, and a spoonful of nut butter. Nothing fancy, but it holds everything together and gives you that soft bite that makes a homemade granola bar feel fresh.
For the s’mores flavor, I reach for mini marshmallows and chocolate chips. The marshmallows melt into little pockets of gooey goodness, and the chocolate turns slightly soft without losing its shape. If you want the extra campfire feel, crumble in a few graham crackers.
I sometimes swap the butter for coconut oil when I want a lighter taste, but honestly, either works. Most of the time, I just grab what is closest and get moving before the kids decide they are “helping” and eat half the mix.
If you enjoy simple vegetable sides to balance out the sweets you might like my Roasted Cabbage Wedges with Saucewhich are quick to prepare and surprisingly addictive.
Step by Step How to Make S’mores Granola Bars
I like to keep this process as low effort as possible, especially on days when the kitchen is already a mess from breakfast. Making S’mores Granola Bars starts with melting the butter, honey, and nut butter together in a medium saucepan over low heat. You want it warm enough to blend smoothly but not so hot that it scorches.
Once the mixture is warm and glossy, stir in the oats until they are fully coated. At this point, the kids usually wander in because it smells sweet and toasty. I save the marshmallows and chocolate chips for last so they hold their shape and keep that s’mores texture we all love.
Press the mixture firmly into a parchment lined pan. This is important because the tighter you pack it, the less likely the bars are to fall apart. Sprinkle the top with extra marshmallows and chocolate chips, then press them gently into the surface. The warmth from the oats will soften the marshmallows just enough to make them stick.
Slide the pan into the fridge for at least an hour. That time feels like forever when Lily and Sophie keep asking if they can taste test, but it is worth the wait. Once chilled, cut the S’mores Granola Bars into squares or rectangles, depending on how generous you are feeling.
Tips for Chewy Kid Friendly Granola Bars
Keeping S’mores Granola Bars soft and chewy is not about luck. It comes down to a few habits I have learned over time in my kitchen. The first is to take your time when melting the butter, honey, and nut butter. If the heat is too high the mixture can separate and that changes the texture of the whole bar. Gentle heat makes all the difference.
The way you press the mixture into the pan matters just as much. I use the back of a spatula or even my hands to press it firmly so everything sticks together. If it is too loose the bars will fall apart and you will find a trail of oats from the kitchen to the living room. I have learned that lesson more than once when making S’mores Granola Bars for the kids.
Adding the marshmallows and chocolate chips at the right time keeps the texture perfect. If the oats are too hot the marshmallows will melt completely and you lose those soft little pockets that make these bars feel like real s’mores. I wait until the mixture is warm but not hot before mixing them in.
Let the bars set in the fridge for the full hour before slicing. It might be tempting to cut them early, especially when Lily and Sophie are asking every few minutes, but the wait is worth it. You get clean slices and S’mores Granola Bars that hold together for days without crumbling.
If you are in the mood for baking my 2 Ingredient Yogurt Bread is one of the easiest breads you will ever make.
Healthier Snack Bar Recipe Variations
S’mores Granola Bars are already a favorite in our house, but every now and then I like to play with the recipe so it feels a little lighter. Sometimes that means swapping the milk chocolate chips for dark chocolate. It gives a deeper flavor, and I tell myself it is a bit better for us, though honestly, I just like the taste.
When I need a nut free version, I use sunflower seed butter instead of peanut or almond butter. It keeps the texture smooth and holds the oats together just as well. This is my go to when I am packing the bars for school since Lily’s class has strict rules about nuts.
If I am feeling extra motivated, I toss in a small handful of flaxseed or chia seeds while mixing the oats. They give a tiny crunch and add a little extra nutrition without changing the flavor. The kids have never noticed, and I am not about to tell them.
For friends who avoid dairy, I use coconut oil instead of butter and choose dairy free chocolate chips. Every time I make this version, it disappears just as quickly as the regular one. A few small changes let me keep the same sweet marshmallow and chocolate flavor that makes S’mores Granola Bars such a treat while giving them a bit of a healthy twist.
Storage and Make Ahead Ideas
One of the things I love about S’mores Granola Bars is how well they hold up after you make them. If I am lucky enough to have leftovers, I keep them in an airtight container on the counter for two to three days. The texture stays soft, and the marshmallows stay just a little gooey, which makes them taste like they were made the same day.
If I know we will not finish them that quickly, I wrap each bar in parchment paper and store them in the fridge. They keep well for about a week, and the cooler temperature makes the chocolate chips a little firmer, which I actually like.
These bars also freeze beautifully. I put them in a single layer on a baking sheet until they are firm, then move them to a freezer bag. They thaw in about thirty minutes at room temperature, so they are perfect for packing in a lunchbox in the morning and having them ready by snack time.
Sometimes I even make a double batch on a quiet Sunday afternoon, keeping half out for the week and freezing the rest. That way, when life gets busy, I can still hand Lily and Sophie a chewy, chocolatey S’mores Granola Bar without spending another minute in the kitchen.
For another sweet that always disappears quickly in my kitchen try my Easy Dark Chocolate Truffle Recipe which is rich and smooth yet comes together in minutes.
Troubleshooting S’mores Granola Bars
Even with a simple no bake recipe, S’mores Granola Bars can sometimes misbehave. I have had my fair share of batches that were too soft, too crumbly, or just not what I pictured. Here are the fixes I have learned over time, so you can skip the frustration and go straight to the good stuff.
Bars falling apart
This usually happens when the mixture is not pressed firmly enough into the pan. I use the back of a spatula and press with more pressure than I think I need. If you are gentle, the bars will crumble when you cut them. Also make sure the oat mixture is still warm when you press it — the warmth helps everything stick together.
Bars too hard
If your S’mores Granola Bars are tough to bite, the sugar mixture might have boiled too long. Aim for a gentle melt instead of a rolling boil. A slow melt keeps the texture soft and chewy. I once got distracted by Lily asking for a snack and came back to find my mixture overcooked — that batch could have doubled as hockey pucks.
Marshmallows melted completely
While melty marshmallows sound delicious, for these bars you want soft pockets of them scattered throughout. If you add them when the oats are still very hot, they will vanish into the mixture. Wait a few minutes until the oats are just warm before stirring them in.
Too sticky to slice
This usually means they need more chilling time. Give them the full hour in the fridge before cutting. If the kitchen is warm, I sometimes pop them in the freezer for a few minutes before slicing. Sophie loves to help cut them, and that is much easier when the bars are firm.
Chocolate chips melting into the mix
If you want them to hold their shape, mix them in last and reserve a few for pressing gently into the top after the bars are in the pan. It makes them look prettier too.
Troubles happen to all of us in the kitchen. The good news is that even a “failed” batch of S’mores Granola Bars still tastes sweet, chocolatey, and worth eating. The kids have never once turned down an imperfect bar.
Serving Suggestions for Every Occasion
S’mores Granola Bars might be simple to make, but they fit into so many moments. I pack them in Lily and Sophie’s lunchboxes when I want to give them something sweet without sending them to school on a sugar overload. By the time they get to it, the marshmallows have softened a little and the chocolate is just right.
For family picnics, I cut the bars into smaller bite sized squares. They are easier to grab and less likely to leave sticky hands and crumbs everywhere. At birthday parties, I sometimes dip half of each bar in melted chocolate and let it set before serving. It makes them look fancy without actually taking much more work.
They also make a great quick dessert for unexpected guests. I keep a batch in the freezer so I can pull out a plate and have something ready in minutes. On colder evenings, I have even crumbled them over a bowl of vanilla ice cream, which David swears is the best way to eat them.
Whether they are part of a lunch, a party table, or a late night snack, S’mores Granola Bars have a way of fitting into the day without feeling out of place. They are as easy to enjoy at a park as they are at the kitchen table.
FAQs About Granola Bars
Why did Quaker discontinue granola bars
Quaker has changed its product lineup many times over the years, usually based on sales or ingredient changes. Some flavors or styles just do not sell as well as others, so they quietly disappear. I still miss a few they used to make, but making my own bars like these S’mores Granola Bars means I never have to worry about my favorite going away.
Do granola bars count as junk food
It depends on what is in them. Store bought bars can be high in sugar and low in nutrients, but homemade versions are easier to control. When I make S’mores Granola Bars at home, I use real oats, natural sweeteners, and keep the portions in check. They are still a treat, but one I feel good about serving to my family.
What is the healthiest granola bar you can buy
The healthiest choice is one with whole ingredients, minimal added sugar, and a good balance of protein and fiber. There are a few brands that fit this, but I like making my own so I can tweak them for what my family needs. Adding seeds, nuts, or dried fruit to a base like my S’mores Granola Bars can make them even more balanced.
What do British people call granola bars
In the United Kingdom, they are usually called flapjacks. I remember the first time I heard that and thought they meant pancakes. The texture is different, but the idea is the same — oats, sweetener, and mix-ins pressed into a bar.
You can find more of my favorite family recipes and behind the scenes kitchen moments on Facebook where I share what is cooking in my home each week.
Conclusion
S’mores Granola Bars have turned into one of those things I make without even thinking about it. They are quick, they are easy, and they never sit around for long. Half the time I am lucky if they make it past the first afternoon without the kids sneaking into the container.
They are more than just a snack here. They show up in lunchboxes, on picnic blankets, and sometimes as a little reward for getting through a busy day. Lily will pick out the marshmallow chunks first, Sophie goes straight for the chocolate, and David pretends he is not eating them while standing over the counter.
If you want something sweet that does not take up your whole day to make, these bars are worth it. They have all the cozy campfire flavor without the smoke and mess, and they fit into just about any moment you need them. Around here, that is reason enough to keep the oats and marshmallows stocked at all times.
If you love collecting recipes for later take a peek at my Pinterest boards where I save easy and delicious ideas for busy days.